GIT Commands


VCS is a software that automatically maintains a record of every change in a project. This way, a team can focus on creating an actual product instead of dealing with non-productive tasks like who modified a specific file.
Also, as VCS is a computer software so it’s more accurate and faster than us. Anyways, let’s have a look at different types of Version Control Systems.
Git is the most commonly used Distributed Version Control System. It keeps a record of every change in a project by taking snapshots. It means you can easily roll back to any previous version/state of a project.
In 2005, Linus Torvalds released the first version of Git. Also, Torvalds also created the Linux operating system.
At first, Git was intended for use by software development teams. But, it’s flexible enough to track any kind of file. So, no matter your profession, whether you’re a teacher, businessperson, graphic designer, or a content writer, Git can help you automatically track your projects.
In this section, you’ll learn how team members can use Git for collaboration. Basically, I’ll help you understand the actual workflow of Git. Later on, you’ll see how Git provides us predefined commands for each purpose. So, let’s get started:
So, this is the basic workflow of any project that uses Git for version control. Now, let’s see how we can actually implement these concepts using Git commands.
By default, Git software doesn’t track each and every file on your computer. We have to inform Git about the specific folder that it must track.
To do so, open your command prompt or terminal inside the specific folder and execute the below command.

This command converts the current directory into a repository. Basically, it tells the Git software to start tracking all files and folders inside this repository.
A point to be noted is that all Git commands start with the keyword git.
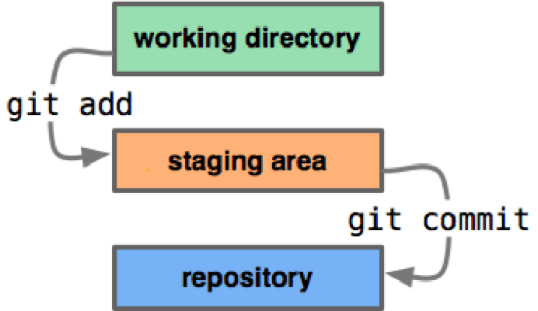
Basically, a Git development environment consists of three sections. The concept behind these sections is of key importance. So, pay extra attention because everything else will depend on this.
 Here, the dot means that all files are modified.
.git. When you commit something, whatever inside your staging area is permanently saved in a repository.You can think of a commit as a checkpoint. So basically, Git compares your previous checkpoint with recent commit to only store the modified files. You can run the below command with a brief message about what is changed. Commit messages are really helpful as it informs other team members about what you did in the commit.
Git allows you to easily check which files are tracked/un-tracked inside a staging area. To do so, you can use the below command:

Many people use it to get the current status of the staging area.
In a real-world scenario, you may find it easier to first create a Repository on a Git hosting provider (e.g. GitHub or Bitbucket ). Then, simply clone it to your local computer. The reason is that they automatically set the remote for you. Meaning your local and remote repositories are connected by default.
But, in case you’ve created a repository on your local computer and then want to connect it with a server. Then, run the below command.

You can specify anything as a [remote_name]. But, conventionally we name it as the origin.
Whereas, remote_url is the path to your Git repository on the server. This URL will be provided by your Git hosting provider.
Here’s an example of how this command will look in a real-world scenario:

In case, you want to check how many remote repositories are connected with your local repository. Simply use the below command:

Now you have connected your local repository with a remote one. It’s time to upload changes to the server. Have a look at the syntax of this command:

It requires the name of your “remote” and “branch” where it will push the changes. By default, we only have one branch which is known as “master”. You’ll learn about branches later in this tutorial.
So, an example of this command will look like this:

In case your teammates are also working on the same project and they have pushed some changes to the server. You can retrieve those changes by using this command:

For example:

By default, when you run this command, Git downloads the modified files and then merges it with your repository. But, if you just want to check whether something is changed on the remote repository or not then use this command instead:

The Git branching model is similar to that of a tree with branches. They’re particularly useful when you want to add a new feature or fix a bug in your project.
Basically, you create a new branch to separately test something. When your work is done then simply merge it with your main branch (i.e. master). In case you don’t like the new idea then you can easily discard the changes without affecting the project.
Use this command to create a new branch:

You can also delete a branch using Git by using this command:

To make any changes in a specific branch, you have to move inside it first. To do so, use this command:

Let’s suppose you have made some changes to a new branch and want to integrate them with your master branch. You can do that by performing a merge operation. Simply use this command:

In simple words, this command is used to combine two branches. If a specific file is changed in both branches then it will create a merge conflict. In that case, you have to manually look into the file and select the change you want and remove the other one.
You just saw how easy it is to start tracking the history of a project using Git. It is a tool that is generally used by programmers and software developers. But, you don’t need to know anything about software development to learn the Git software. It’s packed with commands and has a very simple syntax that anyone can understand.
This article was originally published on Live Code Stream by Juan Cruz Martinez (twitter: @bajcmartinez), founder and publisher of Live Code Stream, entrepreneur, developer, author, speaker, and doer of things.
Live Code Stream is also available as a free weekly newsletter. Sign up for updates on everything related to programming, AI, and computer science in general.